Tutorial: Defrumpifying a Cardigan
By Lesley | November 12, 2008
Full disclosure: I am resistant to writing tutorials. This is partly because I have an unfortunate (and very female) tendency to devalue my own work and capabilities. I avoid telling folks how to do things because I don’t like being authoritative, and I occasionally think whatever I’m sharing is dumb or obvious.
As is the case with the following tutorial. Several folks asked me for it, and I resisted repeatedly, thinking, oh, there’s nothing special about this, anyone could do it. Clearly five years of distance between myself and teaching has resulted in a critical lack of understanding on my part that just because anyone CAN do something (and they can) doesn’t mean some folks don’t need to be told HOW to do it. The fact of this was rammed home for me by the following anecdote:
I was working on a dress that was having some fitting issues, and needed to be taken in at the bust a little bit. In front of a mirror I’d managed to pinch out the adjustment, but as it was right under my arm I couldn’t easily pin it myself. So I trotted out to the family room with a pin and said to my husband: “Can you pin this for me, real quick?”
He looked at me, at the place where I was gripping the fabric, and at the pin. “What do you mean?” he asked.
“Just pin it. I need to take this in, I just need you to pin together the area I’m holding so when I take it off I can adjust it correctly.”
“What do you mean, pin it?”
Exasperated, I grabbed one of his shirttails and slid the pin through it. “Just push it through so it holds the two pieces of fabric together, like this.”
“You just put holes in my shirt!”
“Will you pin this or not?”
This went on for a few minutes more, before I realized that he honestly didn’t know how to pin something. My husband is by no means a stupid guy, but this was simply a skill he’d never had to use before, and had thus never learned.
So, I decided to go ahead and write this tutorial. I welcome feedback, since I’ve never done this before.
This here is my Ridiculously Easy Too-Long-Cardigan Altering Tutorial, intended for folks with minimal sewing experience, and/or who are intimidated by the whole sewing process. All images are clickable for embiggening purposes.
You’ll need an ill-fitting button-front cardigan – I suggest for your first attempt, you NOT use a cardigan you really care about. One of my first rules of sewing is to always have a Test Sew before going for the real thing – if I’m making a dress, I’ll do a muslin mockup before slicing into the good fabric. If I’m altering a cardigan, I’ll use one that won’t break my heart if I destroy it. Maybe scrounge up an old ratty cardigan to practice on, or pick something ugly up for cheap at the thrift shop.
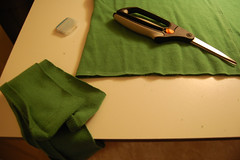
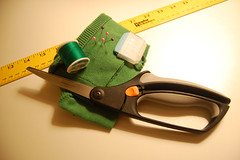 For this project, you’ll require, at minimum, some straight pins, thread, scissors, a ruler or yardstick or other measuring device, a straightedge (I used my yardstick, but you could use any kind of flat-edged object, even a large book), and a needle to sew with. It’ll be easier if you also have some tailor’s chalk (to mark the fabric with) and a sewing machine. That said, this can also be done by hand, it would simply be more time-consuming.
 First item of business is determining how too-long your cardigan is. Put it on, and stand in front of a mirror. A full-length mirror is best, but a bathroom mirror will work fine. Mark the spot where you want the cardigan to end with a pin.
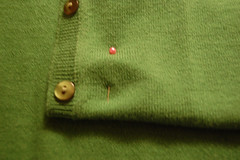
 Take the cardigan off and lay it flat – totally flat – on a level surface. Now see where you pinned it before? Move that pin down a good two inches. Remember that you can always cut more if you don’t shorten it enough, but you can’t put fabric back on the garment if you cut too much off. Be conservative, since you also have to leave room for the seam allowance when you sew your hem. Also, be aware of where the bottom button is in relation to your hem – you want to end the cardigan with a bit of wiggle room left between the last button and the hem.
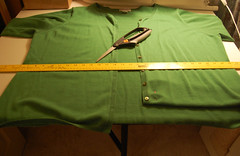
 Using a ruler, measure from the bottom of the cardigan to the spot you’ve pinned. This tells you how much you’re going to cut from the bottom of the sweater. Let’s say for the purposes of this tutorial that it’s three inches. You want to then take your ruler to each of the outer side seams of the cardigan and measure three inches up from the bottom hem, and mark where the three inches end. (I did not photograph this, for some reason, so my apologies.) Next, take your straightedge and draw a straight line in tailor’s chalk between the two marks at the side seams, basically drawing the line on which you’re going to cut off the unwanted length at the bottom of your cardigan. In the absence of tailor’s chalk, you can use regular chalk, or even a felt-tip marker to mark the line, though if you’re using a marker, be aware you’ll have to cut off all the marked fabric unless you’re okay with it showing on the inside of your cardigan’s new hem.
 Cut down the marked line. (This, I saw fit to photograph!)
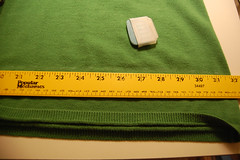
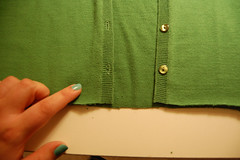 Now you’ve got a shorter cardigan, but it has a raw edge. Note that I’ve left a good amount of room between the bottom button and the edge – this is going to make hemming easier. You’ve got a couple machine-finishing options here: if you have access to a serger, you could just serge the bottom edge and be done with it. If you’re serger-free, you could improvise a similar exposed-edge look with a short zigzag stitch on a standard sewing machine. I am not personally fond of exposed stitching, so I hemmed my cardigan the old-fashioned way.
 Now, folding toward the INSIDE of the cardigan, fold up the bottom edge. My hem here is pretty narrow, mostly because the cardigan I’m using is a fairly small-gauge knit, and I didn’t have a whole lot of space between buttons. Note that my hem ends below the buttonhole – you don’t want to sew over that.
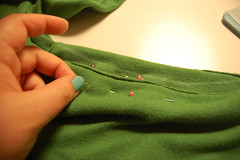
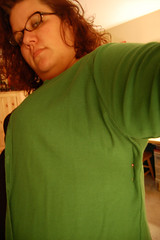 This next bit is optional, but as I was doing it anyway I figured I’d add a little instruction on taking in the cardigan’s sides a bit as well. When I tried it on to mark the length, I noticed that my cardigan was cut like a cardboard box, and I’d prefer it to be a little more fitted. Since it’s knit and stretchy, this is an easy little two-minute cheater fix. I put the cardigan back on, inside out, and pinched in an inch or so on the side seams until it looked like I wanted it. Then I pinned the spot on one side.
 This bit is sort of vague and interpretive. Lay the sweater out flat again, turned inside out. On the side seam under the arm, mark where you pinned. Then draw a gradual curve from the underarm seam down to wherever you want the alteration to end – if your cardigan is way big, you may want to just take it in all the way down to the hem. In my case, I just wanted to smallen the fit in the bust a little, so I drew a line from the sleeve/armpit seam down to just below my bustline.
 Then repeat the process on the other side. In this image the two side seams are right next to each other – I did this to be sure they match. I didn’t actually measure for this bit; I do a lot of minor alterations by just eyeballing things, which is a skill that comes to everyone with increased familiarity with the sewing process, I find.
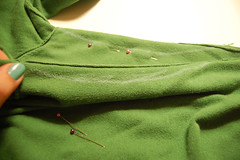 Thus, eyeballing and holding the seams side by side has resulted in a mostly-identical line on both sides of the cardigan.
 Sew along the lines. You can also do this by hand, but try to keep your stitches small and uniform as possible. Also, from one who still makes this mistake – make sure before you sew anything that the sweater is inside out. Otherwise your new seam will be showing on the outside of your garment, which is fine if that’s what you’re going for, but be aware.
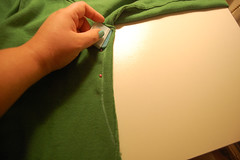
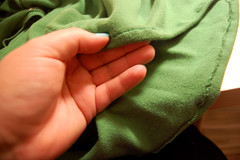
 The seam on the left, under my hand, is the sleeve seam, and to the right, there’s your new, better-fitting side seam. I didn’t bother cutting the extra fabric off, since there’s so little of it, but if you’re taking in more than an inch or so, you may want to cut off the additional fabric between your new seam and the old one, otherwise you may face some bunchy bonus fabric under your arms all the time.
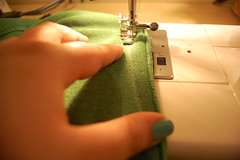
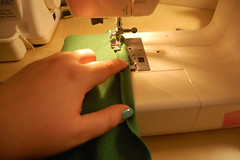 Now, back to the hem. I used a basic straight stitch, though you can use a stretch stitch or a zigzag or something fancy if you’re feeling it – check your sewing machine’s manual for decorative options. If you’re still at a point in your sewing-skill-development where you’re a little anxious using the machine, I strongly recommend pinning the whole hem, all the way around, before popping it under the needle. If you’re using a modern sewing machine, your stitchplate (that’s the metal flat bit on which the fabric rests) should have measurements marked on it. Pinning your hem and making sure the whole garment is hemmed at the same length using the stitchplate markings will result in a more professional-looking hem. Also, try to keep the hem as flat as possible, and try not to stretch the fabric or pull on it as it comes through the machine – you want the upper and lower layers of fabric to be relatively in line with each other.
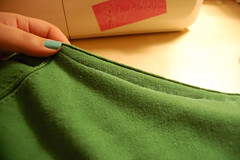
 And there’s my finished hem. Depending on a lot of factors, including the type of fiber used in your cardigan’s fabric and the gauge of the knit, your hem may look a little wavy. This is an occasional fact of sewing with knits, and there are products out there, like hem tape, that can mitigate this, but it’s rarely so dramatic that it bothers me at all.
That’s it. That’s my big one-hour-alterations secret for taking a cheap, unpleasant cardigan and turning it into a better-fitting sweater in a nonfrumpy length that I will actually wear. I hope it’s useful to y’all as well.
Related Posts


Comments are closed.
 Two Whole Cakes is a blog written by